
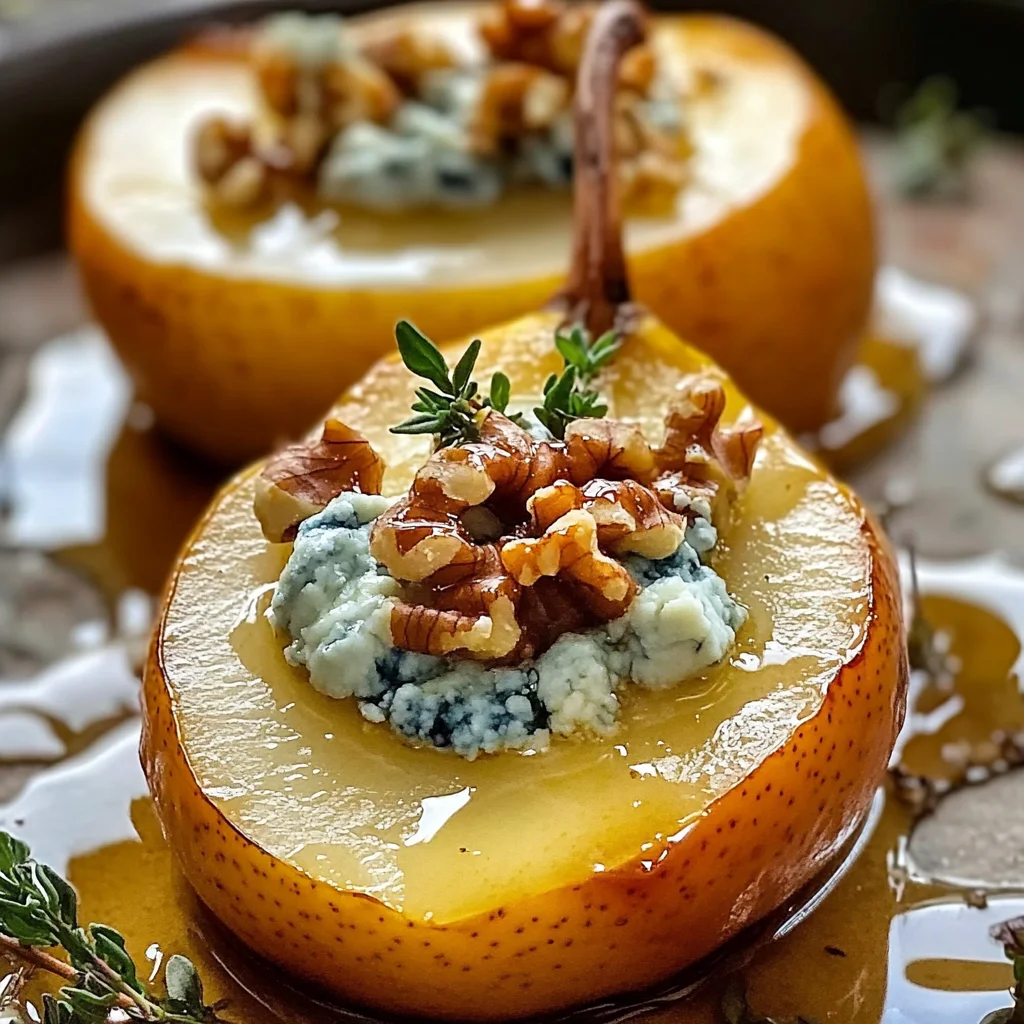
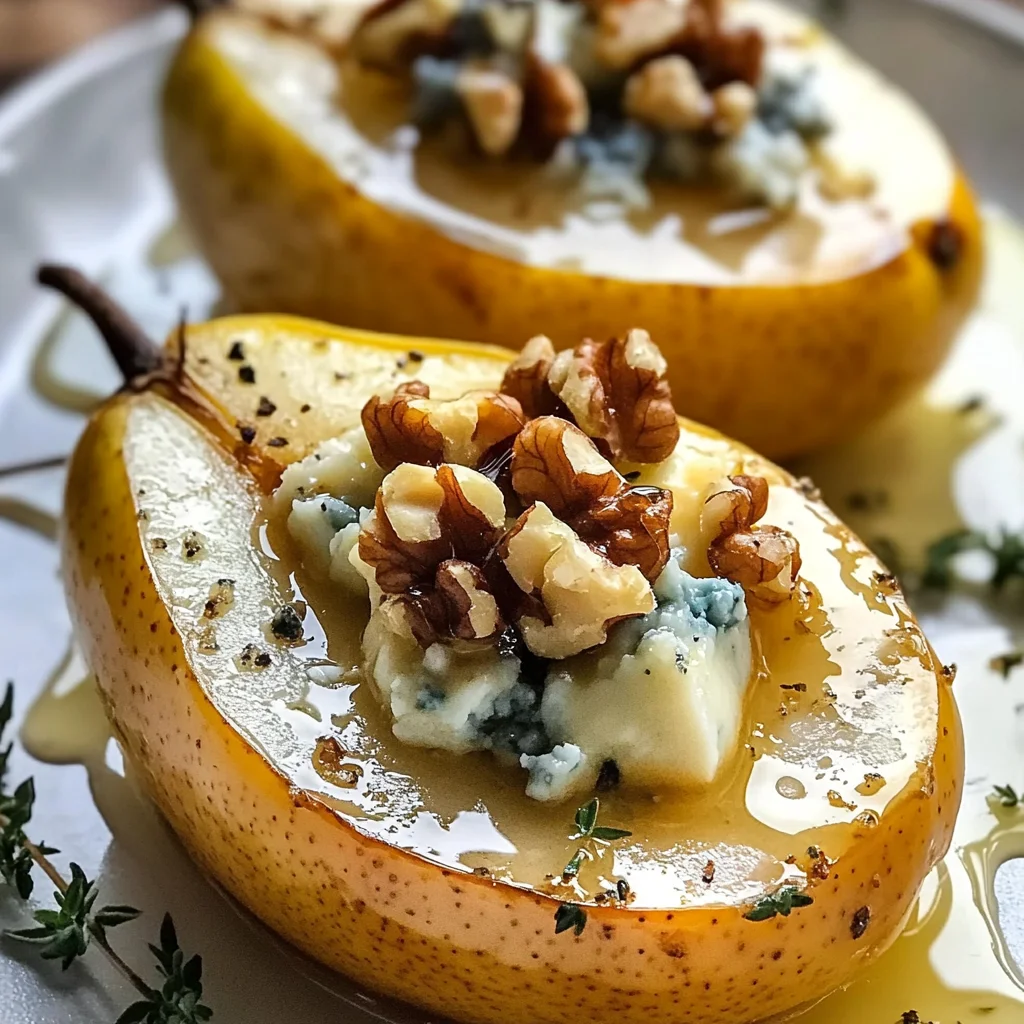
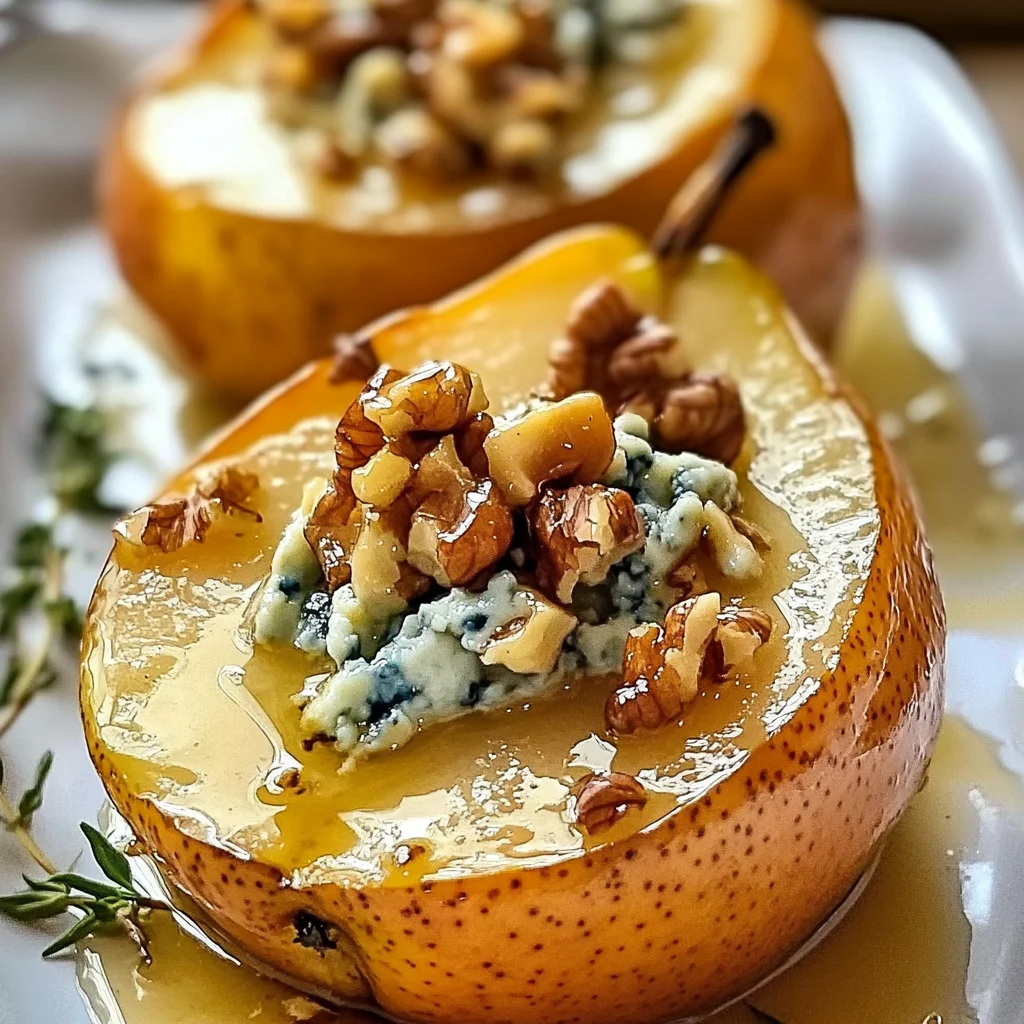
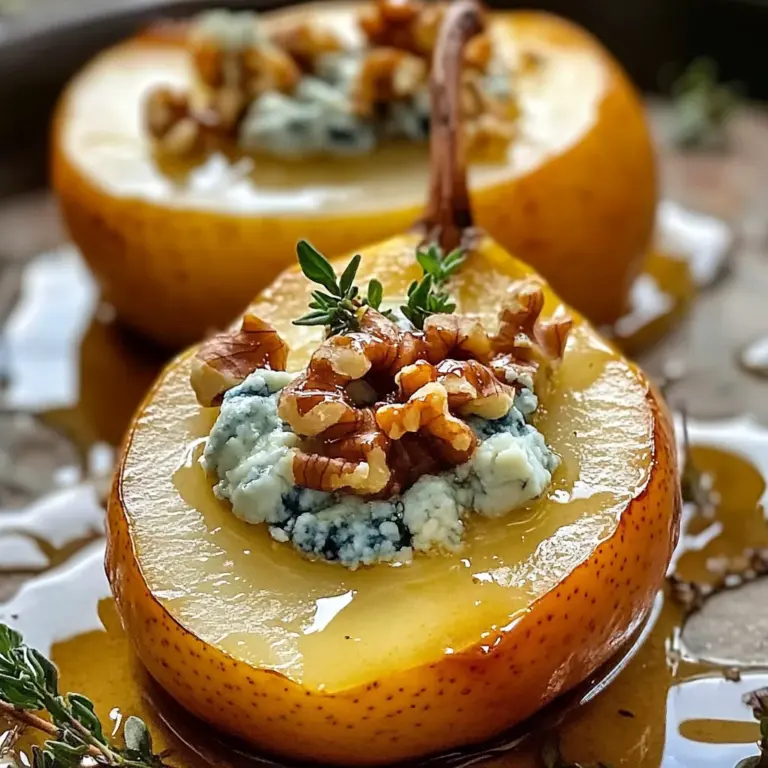
If you’re looking for an easy and elegant appetizer, Roasted Pears with Blue Cheese is the perfect choice. This dish combines sweet and savory flavors with a crunchy yet creamy texture that will delight your guests. Ideal for celebrations, formal dinners, or even a quiet night at home, these roasted pears offer a unique balance you simply can’t miss.
Why You’ll Love This Recipe
- Exquisito equilibrio de sabores: La combinación del queso azul con las peras caramelizadas y la miel crea un sabor inigualable.
- Fácil de preparar: Con pasos simples, esta receta es accesible para cocineros de todos los niveles.
- Versatilidad: Perfecto como aperitivo o postre, se adapta a diferentes ocasiones y paladares.
- Saludable y nutritivo: Las peras son ricas en fibra y vitaminas, convirtiendo este platillo en una opción saludable.
- Impresionante presentación: Su aspecto atractivo hará que tus invitados queden impresionados antes de probarlo.
Tools and Preparation
Para preparar Peras Asadas con Queso Azul, asegúrate de contar con los siguientes utensilios. Tener el equipo adecuado facilita el proceso y garantiza mejores resultados.
Essential Tools and Equipment
- Bandeja para hornear
- Papel pergamino o aluminio
- Cuchillo afilado
- Cucharón o sacabolas
Importance of Each Tool
- Bandeja para hornear: Ayuda a distribuir el calor uniformemente mientras se hornean las peras, asegurando una cocción perfecta.
- Papel pergamino o aluminio: Evita que la miel se queme y facilita la limpieza después de cocinar.
- Cuchillo afilado: Permite cortar las peras fácilmente sin aplastarlas, manteniendo su forma.
- Cucharón o sacabolas: Ideal para retirar el centro de las peras y crear espacio para el relleno.
Ingredients
For the Pears
- 4 peras maduras pero firmes (Bartlett, Anjou o Bosc)
For the Topping
- 2 cucharadas de mantequilla derretida
- ¼ taza de queso azul desmenuzado (puedes sustituir por Gorgonzola si prefieres un sabor más suave)
- ¼ taza de nueces tostadas y picadas
For the Drizzle
- 2 cucharadas de miel (más extra para decorar)
For Flavoring
- 1 cucharada de jugo de limón fresco
- ½ cucharadita de canela en polvo (opcional)
For Garnish
- Tomillo fresco para decorar (opcional)
How to Make Peras Asadas con Queso Azul – Aperitivo Fácil y Elegante
Step 1: Preheat the Oven
Precalienta el horno a 190°C (375°F). Este paso es crucial para asegurar que las peras se cocinen uniformemente.
Step 2: Prepare the Baking Sheet
Forra una bandeja para hornear con papel pergamino o aluminio. Esto ayudará a evitar que la miel se queme durante la cocción.
Step 3: Prepare the Pears
Corta las peras por la mitad a lo largo. Usa un cuchillo afilado para hacer cortes limpios.
Step 4: Remove the Core
Con una cuchara o un sacabolas, retira el centro y las semillas, creando una pequeña cavidad en cada pera. Asegúrate de no cortar demasiado profundo.
Step 5: Add Butter and Cinnamon
Pincela las peras con mantequilla derretida. Si lo deseas, espolvorea canela sobre ellas para añadir un toque extra de sabor.
Step 6: Place Pears on Baking Sheet
Coloca las peras con el lado cortado hacia arriba en la bandeja forrada. Asegúrate de que haya suficiente espacio entre ellas.
Step 7: Bake the Pears
Hornea por 20-25 minutos. Las peras deben estar tiernas y ligeramente doradas al final del tiempo recomendado.
Step 8: Fill with Cheese and Nuts
Retira las peras del horno. Rellena cada cavidad con queso azul desmenuzado y nueces picadas.
Step 9: Drizzle with Honey and Lemon Juice
Rocía miel sobre cada pera rellena y añade unas gotas de jugo de limón fresco para resaltar los sabores.
Step 10: Bake Again
Regresa al horno por unos 5 minutos más hasta que el queso comience a derretirse ligeramente. Esto le dará una textura cremosa al platillo.
Step 11: Cool Slightly
Retira del horno y deja enfriar unos minutos antes de servir. Esto ayudará a que los sabores se asienten.
Step 12: Garnish and Serve
Decora con tomillo fresco y añade un poco más de miel antes de servir. ¡Disfruta tu aperitivo fácil y elegante!
How to Serve Peras Asadas con Queso Azul – Aperitivo Fácil y Elegante
These roasted pears with blue cheese are not only delicious but also visually appealing. Serving them beautifully can elevate the dining experience, making them perfect for gatherings or special occasions.
Individual Platters
- Arrange each pear half on a small plate for an elegant presentation. Drizzle extra honey over the top for added sweetness.
Cheese Board Addition
- Incorporate the pears into a cheese board, pairing them with assorted cheeses, crackers, and fruits. This combination creates a delightful contrast in flavors and textures.
Salad Topping
- Slice the roasted pears and add them as a topping on mixed greens. A light vinaigrette dressing will enhance the dish’s freshness.
Appetizer Skewers
- Thread pieces of roasted pear, blue cheese, and walnuts onto small skewers. These handheld bites make for easy serving and dining.
Dessert Plate
- Serve the pears alongside a scoop of vanilla ice cream or Greek yogurt. The creamy addition complements the sweetness of the honey and pears beautifully.
How to Perfect Peras Asadas con Queso Azul – Aperitivo Fácil y Elegante
Perfecting your roasted pears can enhance their flavor and presentation. Here are some tips to ensure your dish stands out.
- Choose ripe yet firm pears: Select pears that are mature but still hold their shape when baked, ensuring they don’t turn mushy during cooking.
- Experiment with spices: Add unique flavors by incorporating spices such as nutmeg or ginger along with cinnamon for a different twist.
- Use quality cheese: Opt for high-quality blue cheese or Gorgonzola to elevate the taste profile; their distinct flavors will shine through.
- Mind the baking time: Keep an eye on the baking process; removing them at just the right moment ensures they are tender but not overly soft.
- Garnish creatively: Fresh herbs like thyme or rosemary not only add flavor but also enhance visual appeal when sprinkled before serving.
- Serve warm: Enjoy these pears warm from the oven to experience their gooey texture and rich flavors at their best.
Best Side Dishes for Peras Asadas con Queso Azul – Aperitivo Fácil y Elegante
Pairing side dishes with your roasted pears can create a well-rounded meal. Here are some great options to consider.
- Arugula Salad: A fresh arugula salad dressed with lemon vinaigrette adds brightness that balances the richness of the pears.
- Quinoa Pilaf: Fluffy quinoa mixed with herbs and nuts provides a nutritious base that complements the dish’s flavors without overpowering them.
- Roasted Vegetables: Seasonal roasted vegetables like Brussels sprouts or carrots offer earthy tones that pair well with sweet notes from the pears.
- Grilled Chicken Breast: A simple grilled chicken breast seasoned with herbs makes a protein-rich side that contrasts nicely with the sweetness of the dish.
- Couscous with Herbs: Fluffy couscous tossed with fresh herbs enhances texture while being light enough not to overshadow your main dish.
- Herbed Polenta: Creamy polenta infused with fresh herbs offers a comforting base, perfect for soaking up any excess honey from the pears.
- Savory Scones: Lightly flavored scones made with cheese and herbs provide an additional layer of flavor that pairs beautifully with both sweet and savory elements of your dish.
- Stuffed Bell Peppers: Colorful bell peppers filled with grains, beans, and spices add vibrant color while being hearty enough to balance out your meal.
Common Mistakes to Avoid
- Avoiding proper pear selection: Choose the right type of pear. Opt for firm and ripe varieties like Bartlett, Anjou, or Bosc for the best texture and flavor.
- Overcooking the pears: Be mindful of baking time. Keep an eye on your pears as they bake to prevent them from becoming mushy; they should be tender yet hold their shape.
- Not using enough seasoning: Enhance flavors with spices. Adding a sprinkle of cinnamon or fresh thyme can elevate the dish significantly—don’t skip these extras!
- Skipping the honey drizzle: Don’t forget the finishing touch. A drizzle of honey before serving adds a sweet contrast to the savory blue cheese and enhances overall taste.
- Ignoring presentation: Make it visually appealing. Arrange your peras asadas elegantly on a platter and garnish with fresh herbs for a stunning presentation.
Storage & Reheating Instructions
Refrigerator Storage
- Store in an airtight container for up to 3 days.
- Ensure that the dish has cooled completely before sealing.
Freezing Peras Asadas con Queso Azul – Aperitivo Fácil y Elegante
- Freeze for up to 2 months in an airtight container or freezer-safe bag.
- To maintain quality, wrap each pear individually if possible.
Reheating Peras Asadas con Queso Azul – Aperitivo Fácil y Elegante
- Oven: Preheat to 180°C (350°F). Cover with foil and heat for about 10-15 minutes until warmed through.
- Microwave: Heat on medium power for 1-2 minutes, checking frequently to avoid overcooking.
- Stovetop: Place in a non-stick pan over low heat, cover, and warm gently for about 5 minutes.
Frequently Asked Questions
What are Peras Asadas con Queso Azul – Aperitivo Fácil y Elegante?
Peras Asadas con Queso Azul – Aperitivo Fácil y Elegante are roasted pears topped with blue cheese, walnuts, and honey, making them a delightful sweet-savory appetizer.
Can I use different cheeses instead of blue cheese?
Yes! If you prefer milder flavors, Gorgonzola or even goat cheese can be great alternatives.
How do I customize this recipe?
Feel free to experiment by adding other nuts like almonds or pecans or incorporating different spices such as nutmeg for added warmth.
Are there any vegan alternatives?
You can replace blue cheese with a plant-based cheese option and use maple syrup instead of honey for a vegan version.
What dishes pair well with Peras Asadas con Queso Azul – Aperitivo Fácil y Elegante?
These roasted pears make a great starter alongside salads or as part of a cheese board during gatherings.
Final Thoughts
Peras Asadas con Queso Azul – Aperitivo Fácil y Elegante is an exquisite balance of sweet and savory flavors that is sure to impress at any gathering. This versatile recipe can be easily customized with different cheeses or nuts to fit your preferences. Don’t hesitate to try it out at your next event!
Peras Asadas con Queso Azul
Indulge in the delightful experience of Peras Asadas con Queso Azul – Aperitivo Fácil y Elegante. This elegant dish features perfectly roasted pears, which are sweet and tender, topped with rich blue cheese, crunchy walnuts, and a drizzle of honey. The combination of flavors creates a unique balance that tantalizes the taste buds, making it suitable for any occasion—from intimate dinners to festive gatherings. Easy to prepare, this recipe is not only visually stunning but also packed with nutrients, ensuring your guests will be impressed both by its appearance and taste.
- Total Time: 40 minutes
- Yield: Serves 4
Ingredients
- 4 ripe but firm pears (Bartlett, Anjou, or Bosc)
- 2 tablespoons melted butter
- 1/4 cup crumbled blue cheese (or Gorgonzola)
- 1/4 cup toasted and chopped walnuts
- 2 tablespoons honey
- 1 tablespoon fresh lemon juice
- Optional: 1/2 teaspoon ground cinnamon for flavor enhancement
- Optional: Fresh thyme for garnish
Instructions
- Preheat oven to 190°C (375°F).
- Line a baking sheet with parchment paper.
- Halve the pears lengthwise and remove seeds to create a small cavity.
- Brush cut sides of pears with melted butter; sprinkle with cinnamon if desired.
- Place pears cut-side up on the baking sheet and bake for 20-25 minutes until tender.
- Remove from oven; fill cavities with blue cheese and walnuts.
- Drizzle honey and lemon juice over each pear half.
- Return to the oven for another 5 minutes until the cheese melts slightly.
- Allow to cool briefly before serving; garnish with thyme if using.
- Prep Time: 10 minutes
- Cook Time: 30 minutes
- Category: Appetizer
- Method: Baking
- Cuisine: Gourmet
Nutrition
- Serving Size: 1 pear half (approximately 100g)
- Calories: 210
- Sugar: 18g
- Sodium: 150mg
- Fat: 10g
- Saturated Fat: 4g
- Unsaturated Fat: 6g
- Trans Fat: 0g
- Carbohydrates: 30g
- Fiber: 5g
- Protein: 4g
- Cholesterol: 15mg
Keywords: Choose ripe yet firm pears to ensure they hold their shape while baking. Experiment with different cheeses or add spices like nutmeg for variation. Serve warm for the best texture and flavor experience.